|
Replacing G-Carriage Motor
1. Remove Needle and Row Tripper and Knit-leader tripper.
Slide all
3 switches to the right (important!)
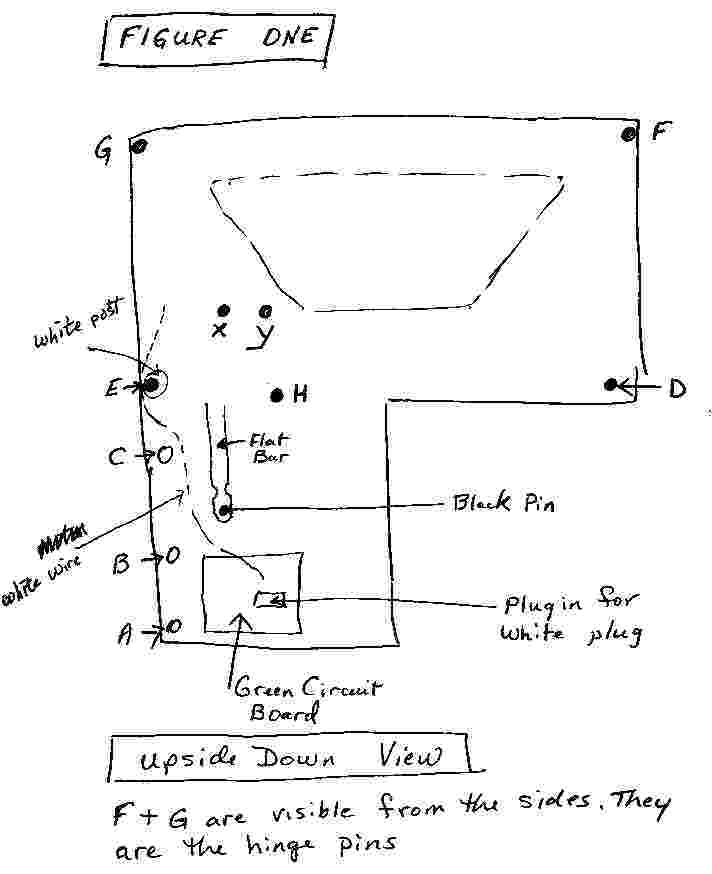
2. See Figure One.
Turn G-Carriage upside Down.
With a Phillips
screwdriver, remove the 3 screws....A, B, C
3. Lift off this cover (bottom cover). Set aside...place screws
back in ths cover so you can find them later.
4. Remove Rubber wheel on Right hand side (screw D is underneath
it)
5. Remove screws D, E
6. Lift flap with brush (Sinker plate). Underneath this is screw H. Remove
this screw
7. Remove screws F and G. These are the hinge pins and are visible from the sides.
8. Unplug the white plug from the green circuit board. (you can see that it can only plug in one way).
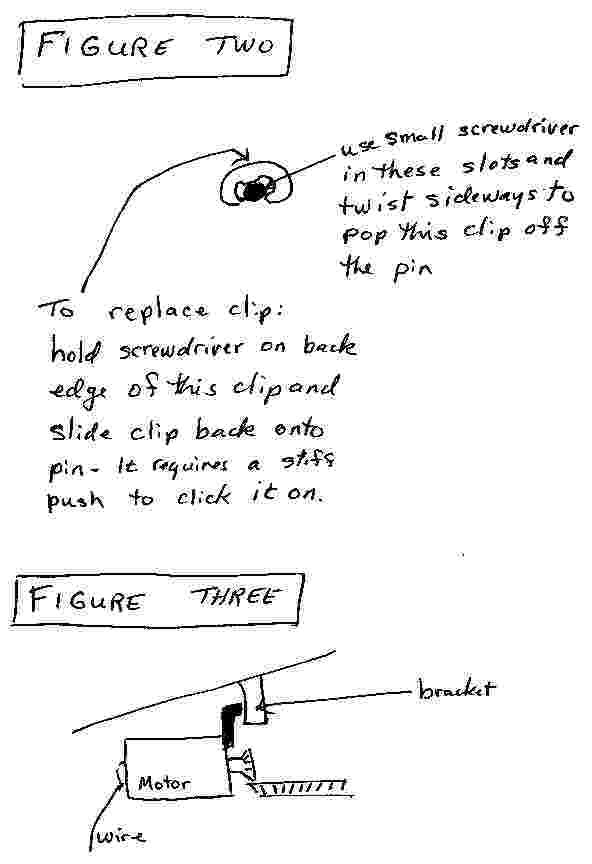
9. Now remove the E clip (looks kind of like and E or C) from the black pin sticking up through the flat bar.
see FIGURE TWO
10. With the G-carriage still upside down, lift the whole mechanism out of the plastic case.
11. This leaves all the slide switches in the case. Set the case aside.
12. Figure One
Remove screws X and Y. These hold the motor in place. Look at the motor before you remove these screws so you can
see how it will sit back in. Make drawings if you need to
13. Lift up the base of the G-carriage, this
is the part that stays on the needle when you lift the G-carr to slide it along.. If you lift this with your right
hand you can grab the motor with you left hand and wiggle it out (may need to rotate it to get it out).
14.
Now holding the motor and the g-car (since motor is still conected by the red and white wire) turn the g-car over
so it is right side up.
15. Unplug the wire coming from the motor where it connects to the g-car. It goes
over the top. Cut the plastic ties holding this wire in place. It holds other wires too.
16. Plug in
new motor.
17. Replace those 2 wire ties with plastic coated twist ties or string or cord, secure tightly
and cut off ends so they don't get into anything.
18. Turn G-car back upside down (hold motor too)
19.
See FIGURE THREE
Looking at side where motor came out, lift the base of g-car, you will see that there is
a bracket that keeps this base from lifting very high. Put you finger behind this bracket and pull towards you
until it slides out enough to let this base lift up another quarter of an inch or so . This will give you room
to slide the motor into place which is what you do now.
20 After the motor has been put in, push bracket back
to let base slide back down again.
21. Now put screws X and Y back in. Push motor around until screw holes
line up. Tighten screws when you have them both in place
22. Turn right side up again
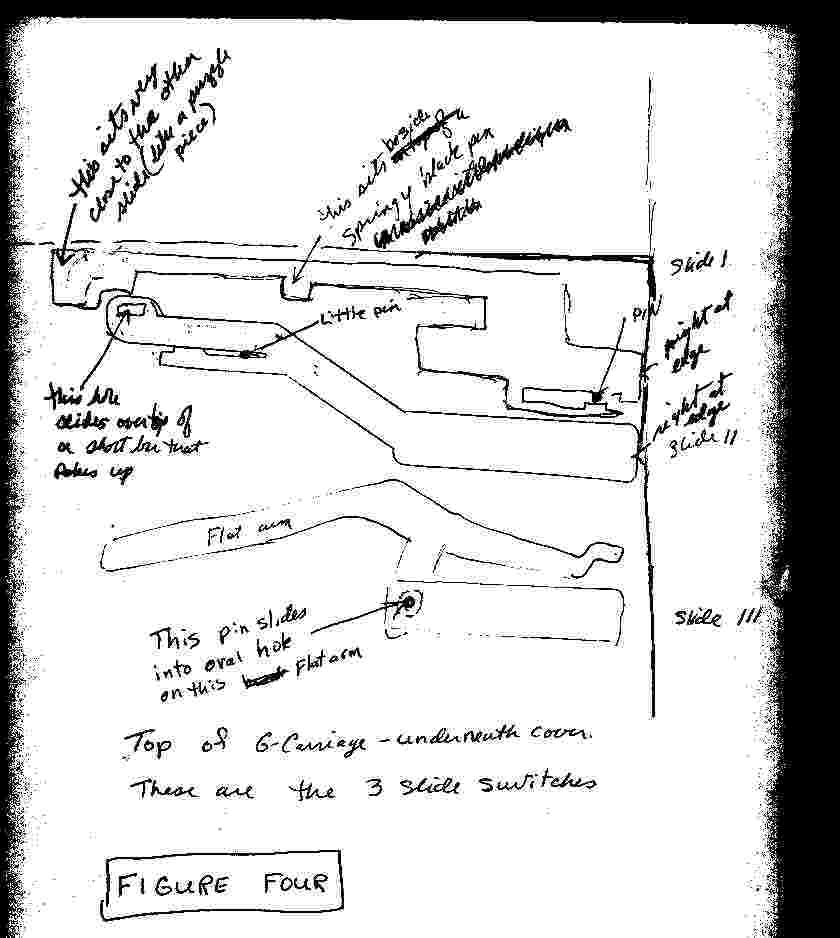
23. see FIGURE
FOUR
place all the plastic slide switches back on the machine.
24. See the pin on bottom of slide
III, place it into hole on flat arm. See the little pin that Slide II must sit around.
Slide I sits beside
springy black pin.
Slide II and Slide I line up very close to right edge of G-car.
25. Now put case
back over the g-car. Make sure all switches sit right and move with out binding or Jamming.
26. Now screw
F and G (hinge pins) back in. They should go in easily if everything is in place. (see Figure One for placement
of white electical wire)
27. Get a couple of paperbacks or something that you can rest the g- carriage on
when you turn it over so that the switches do not hit the table.
27. Now, holding everything thightly together
so switches don't move, turn back over upside down placing paperback books or something under it so the switches
don't hit the table so that they stay in place. Kind of suspend the g-car on these books.
28. Now put flat
bar back in place over the black pin and put the e-clip back on--It will kind of click into place when you have
it all the way in place. See Figure Two.
29. See FIGURE ONE Make sure white wire is to the left (outside)
of the white post- push down in enough to get it out of way of things. You don't want it rubbing on the gears.
30. You might have to lift the base slightly to lift the wire over the post if if has gotten on the wrong side
of the post.
31. Replace screws D, E H. Tighten
32. Replace bottom (needle) cover and replace screws
A, B, C
33. Check to make sure all the slide switches operate properly and case sits properly around them
34. Replace Needle, and both trippers.
35. POUR COFFEE, SMILE, RELAX, WIPE BROW AND PAT YOURSELF
ON THE BACK
NOTE: PLACE PAD ON TABLE BEFORE YOU START TO WORK, AN OLD TOWEL WORKS GOOD. YOU WILL GET BLACK GREASE
FROM THE G-CARRIAGE ALL OVER THE CARRIAGE AND YOUR HANDS, DON'T WORRY, WASH YOUR HANDS WITH DISH SOAP AND CLEAN G-CARRIAGE
LIKE YOU ALWAYS DO. IT DOES NOT STAIN CARRIAGE.
TOOLS REQUIRED: PHILLIPS SCREWDRIVERS (MED SIZE )
SMALL BLADE SCREDRIVER--LIKE A SEWING MACHINE
copyright: Gladys Goodey 1999
|